How I Organize What I Read, Learn and Write in Obsidian
I have written a lot of notes that I never saw again. Not because I deleted them. They were still somewhere on my computer, carefully saved inside a folder with a sensible name. The problem was remembering that they existed when I actually needed them. That is the strange thing about most note-taking systems. We spend a lot of time thinking about how to store information and surprisingly little time thinking about how we will find our way back to it.
You read something interesting. You write a note. You choose a folder. Maybe you add a tag. Then you move on. Months later, you are working on something related and vaguely remember, I know I wrote something about this before. So you search, open a handful of notes that are not quite right. Eventually, you either find it after far too much searching or give up and recreate the idea from scratch. The note is still there. The problem is that it just never found its way back into your thinking.

Obsidian approaches note-taking differently. Instead of treating notes as isolated documents that need to be carefully filed away, Obsidian encourages you to think about how ideas relate to one another. Suppose I am reading about confounding and create a note about it. Somewhere in that note, I mention g-computation. I can simply wrap g-computation in double brackets: [[g-computation]]. Those double brackets create a link. If I already have a note called g-computation, clicking the link takes me there. If I do not, Obsidian lets me create one. More importantly, the relationship works in the other direction too. When I eventually open my g-computation note, I can see that the confounding note links back to it. As I keep reading and writing, these connections accumulate and gradually becomes a network of ideas.
There is another reason I became comfortable with Obsidian. Your notes are simply Markdown files stored in an ordinary folder on your computer. They are not locked inside a proprietary database that only one application understands. Open your Obsidian vault in Finder or File Explorer and your notes are right there as .md files. You can open them with another text editor, move them, back them up, or manage them however you want. If you stopped using Obsidian tomorrow, your notes would still be yours and would still be readable.
Obsidian is also free to use. The features that make the application powerful, including plugins, themes, graph view, linking, and multiple vaults, are available without paying for a subscription. There are paid services such as Obsidian Sync for syncing your vault across devices and Obsidian Publish for publishing notes to the web, but they are optional conveniences. Check obsidian.md/pricing for current numbers, since they change.
And that brings me to this guide. I use Obsidian mainly for academic and research work, so that is the perspective I will use throughout this guide. You will see examples involving papers, methods, concepts, research projects, and ideas I want to revisit later. But there is nothing inherently academic about the system. The same approach can work for work projects, meeting notes, books, personal writing, recipes, or almost anything else you want to keep and connect.
I also do not want this to become one of those Obsidian tutorials where we install twenty-seven plugins, create fourteen folders, design an elaborate tagging taxonomy, and spend three hours building a system for taking notes before we have actually taken a note. We are going to start small. We will install Obsidian, create a vault, understand the few pieces of Markdown you actually need, create our first linked notes, and develop a simple structure for organizing them. From there, we can add templates, daily notes, plugins, backups, and some of the more powerful features, but only when there is a reason for them.
Step 1 — Install and create your first vault
Download Obsidian from obsidian.md for macOS, Windows, Linux, iOS, or Android. There is no account to create: the app opens straight into a prompt asking what you want to do. Choose Create new vault, give it a name, and pick where it lives on disk.
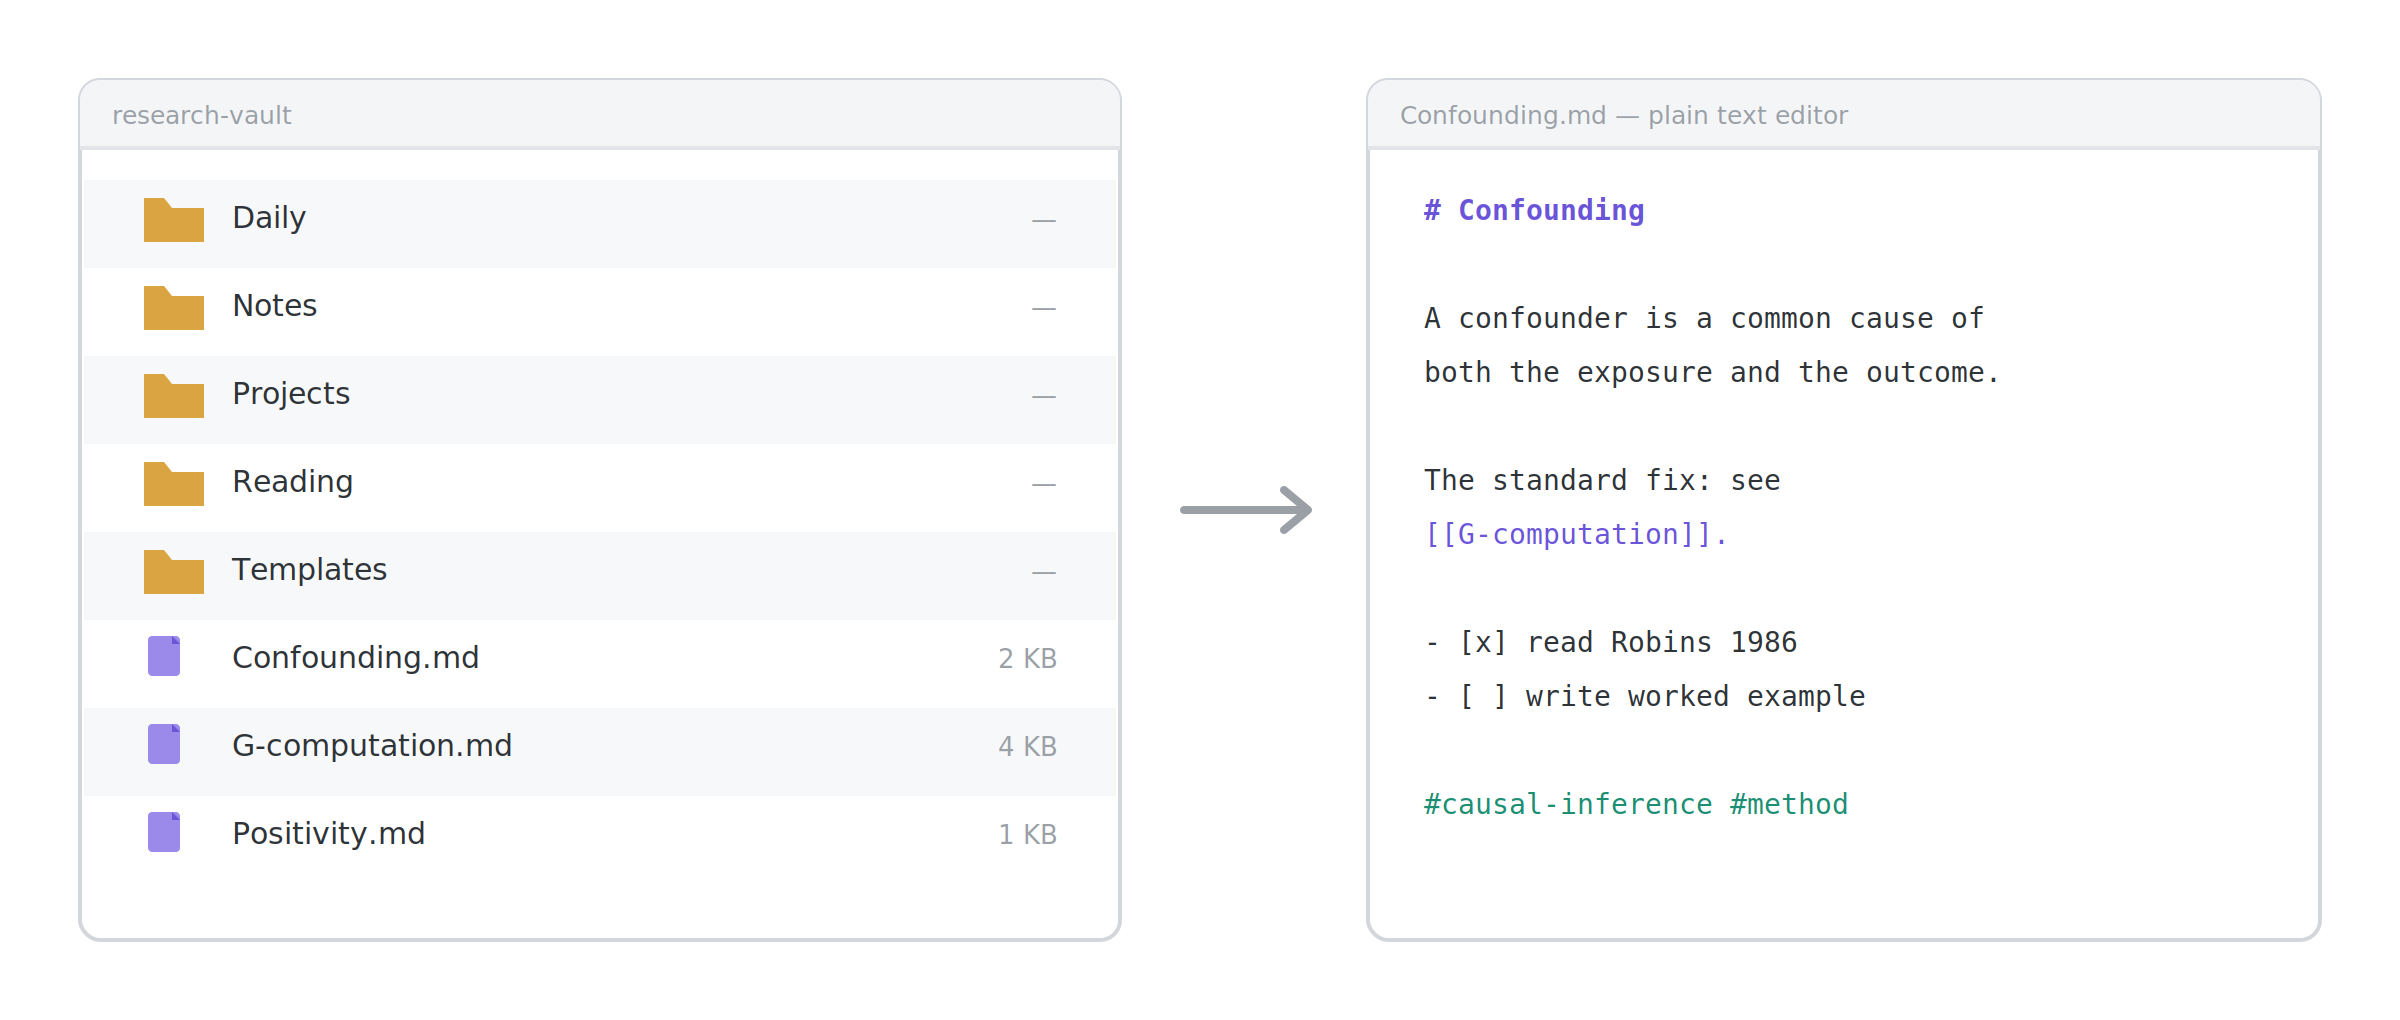
A vault is a folder. Inside it are .md text files and a hidden .obsidian/ subfolder holding your settings. That is the entire architecture. Open the folder in Finder or Explorer right now and you will see your notes sitting there as ordinary files.
Step 2 — Learn the three panes
Open your vault and you will see a mostly blank window. Here is what you are looking at.
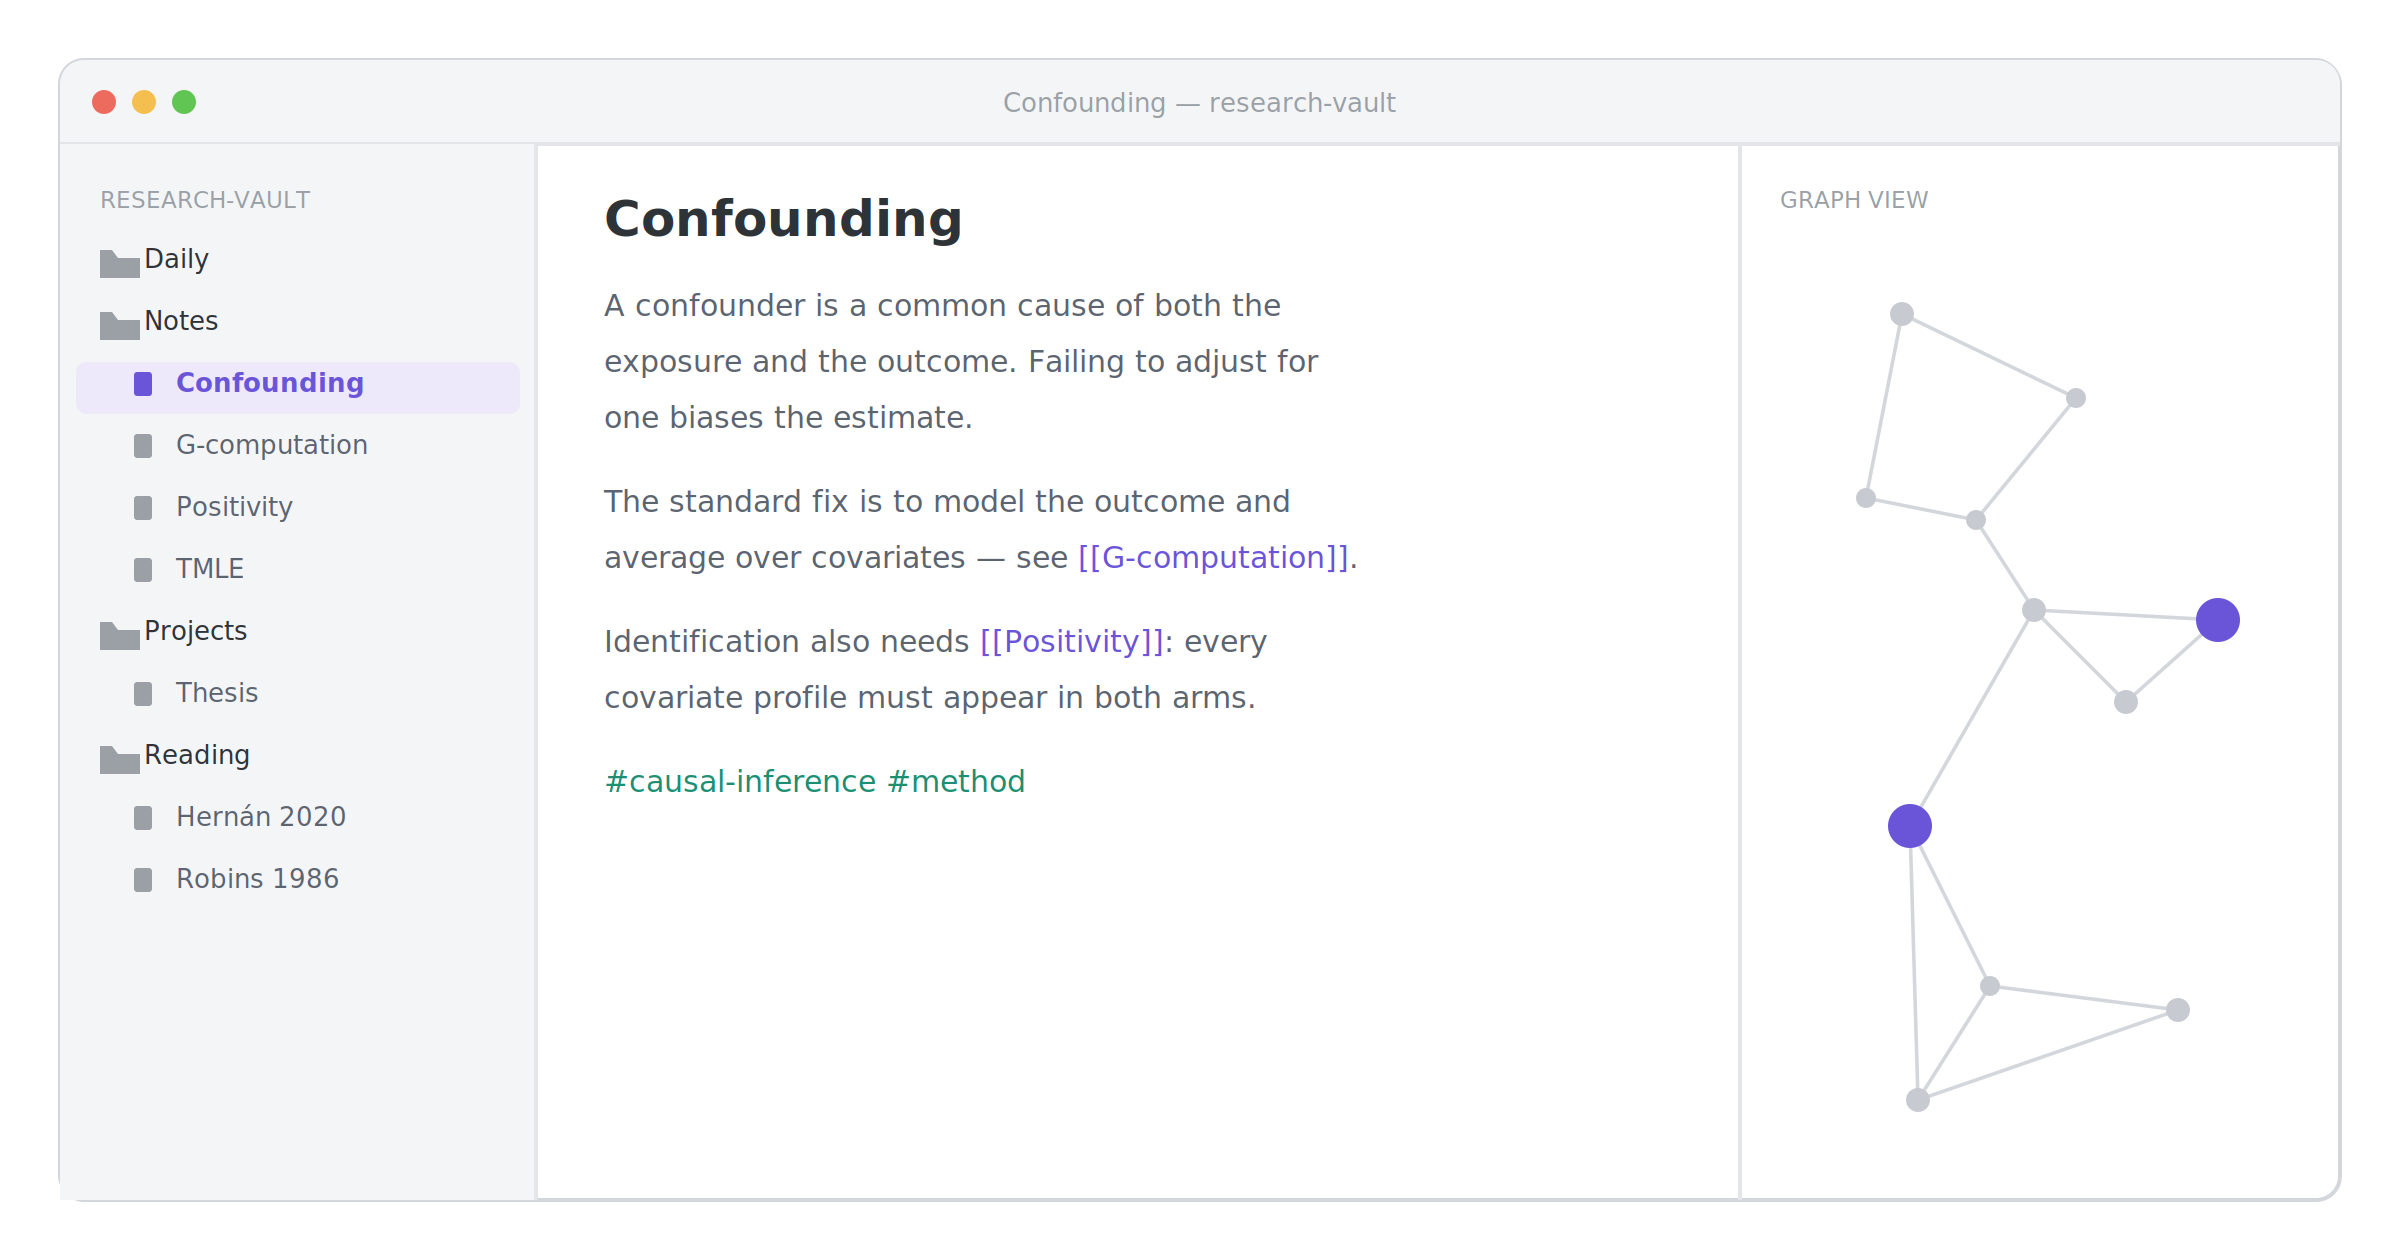
On the left, the file explorer lists every note in your vault; folders here are real folders on disk. In the middle, the editor is where you write. On the right, the graph view shows your notes as dots and their links as lines.
A handful of shortcuts cover most of what you will do:
| Shortcut | What it does |
|---|---|
Ctrl/Cmd + N |
New note |
Ctrl/Cmd + O |
Quick switcher — jump to any note by name |
Ctrl/Cmd + P |
Command palette — every command, searchable |
Ctrl/Cmd + E |
Toggle editing / reading view |
Ctrl/Cmd + Shift + F |
Search across the whole vault |
Ctrl/Cmd + click |
Open a link in a new pane |
If you learn only one, make it Ctrl/Cmd + O.
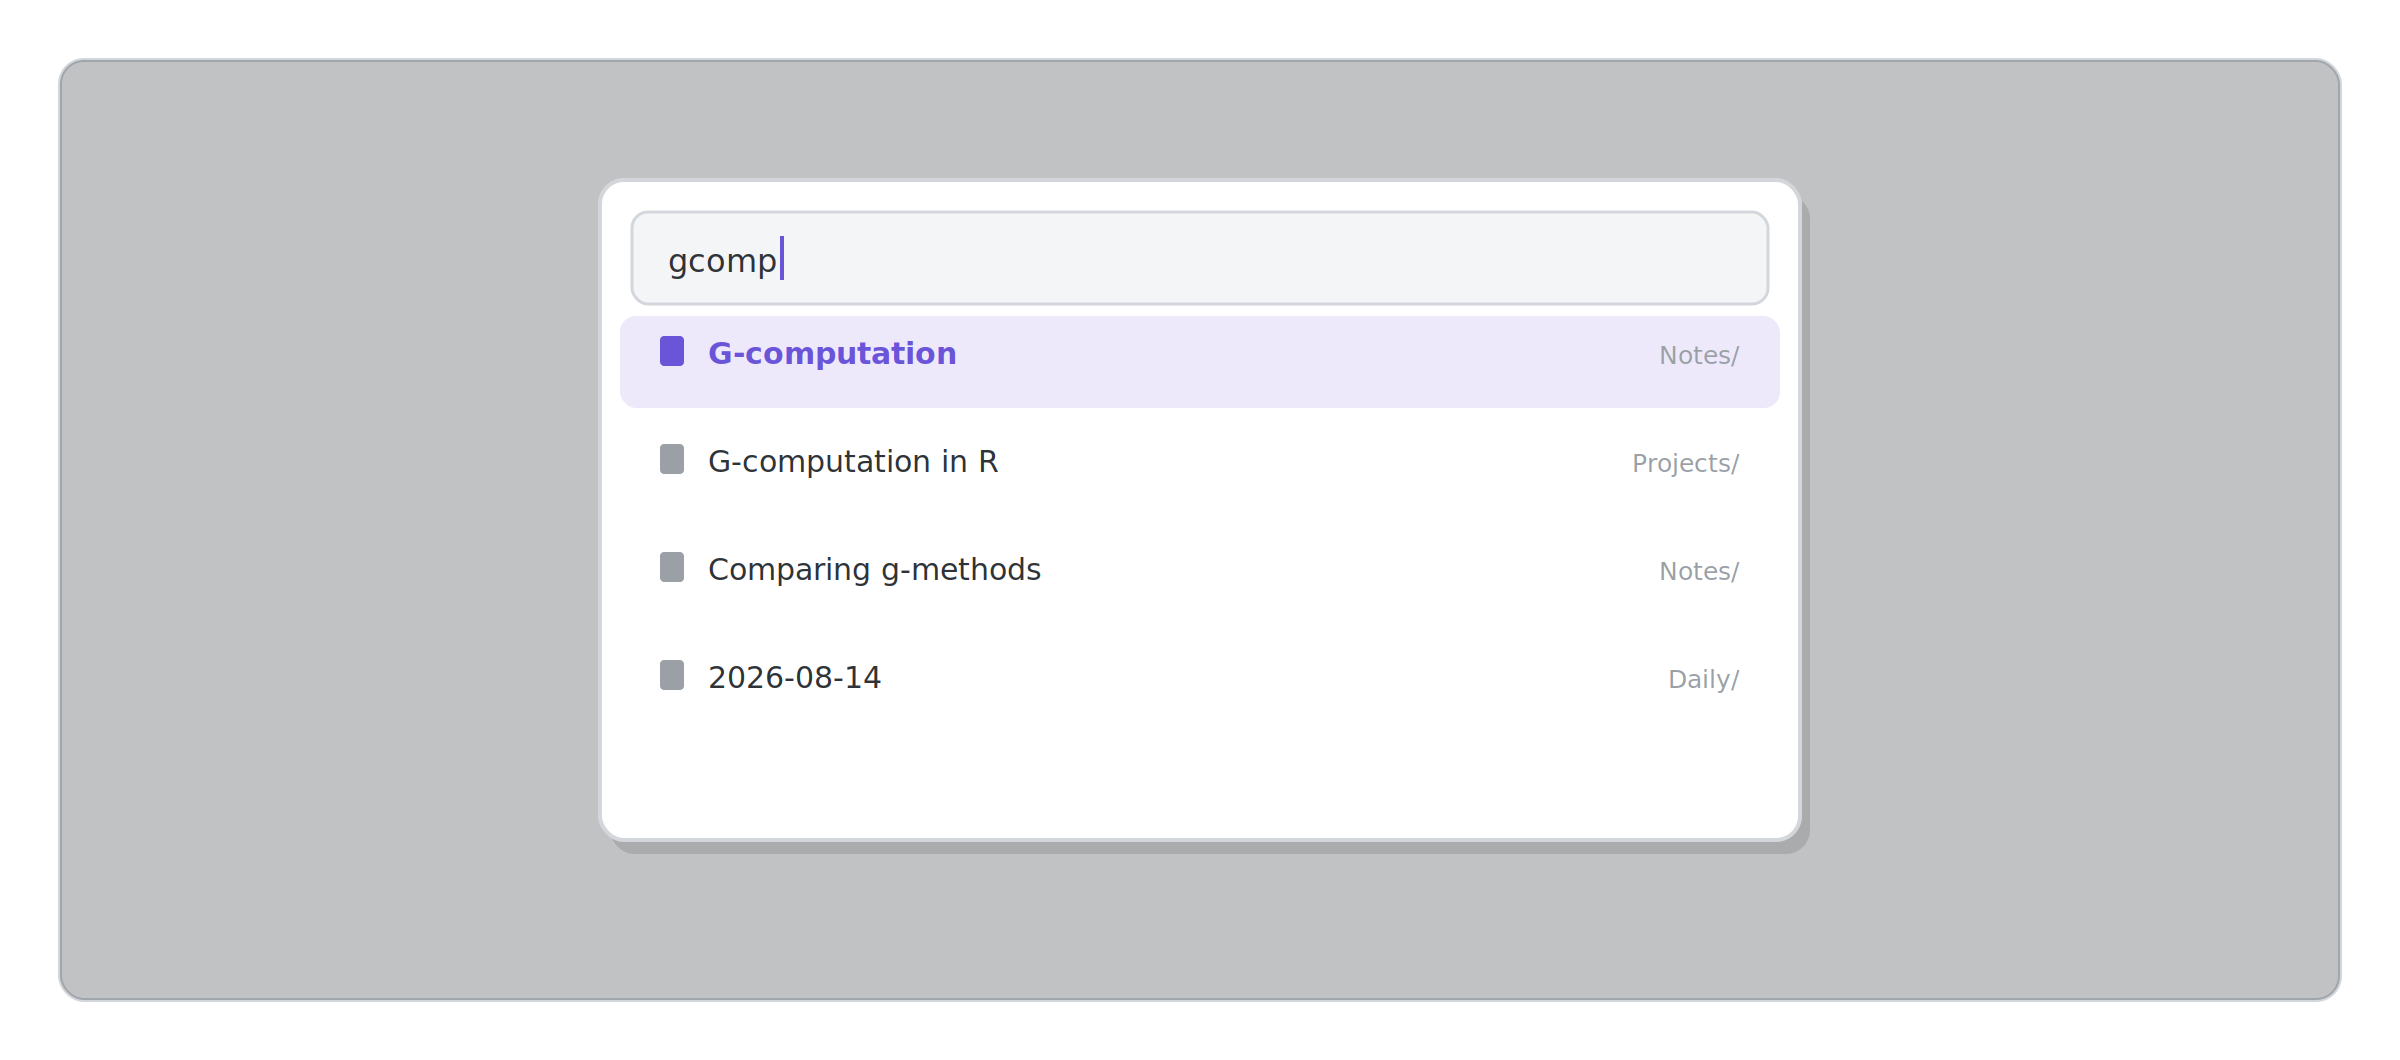
Type three or four letters and the note you want is usually the top hit. Once you pass a few hundred notes this becomes how you navigate almost exclusively, and the file explorer turns into decoration.
Step 3 — Write Markdown without thinking about it
Obsidian notes are Markdown, but you rarely have to think about syntax. You type a few characters and the formatting appears live.
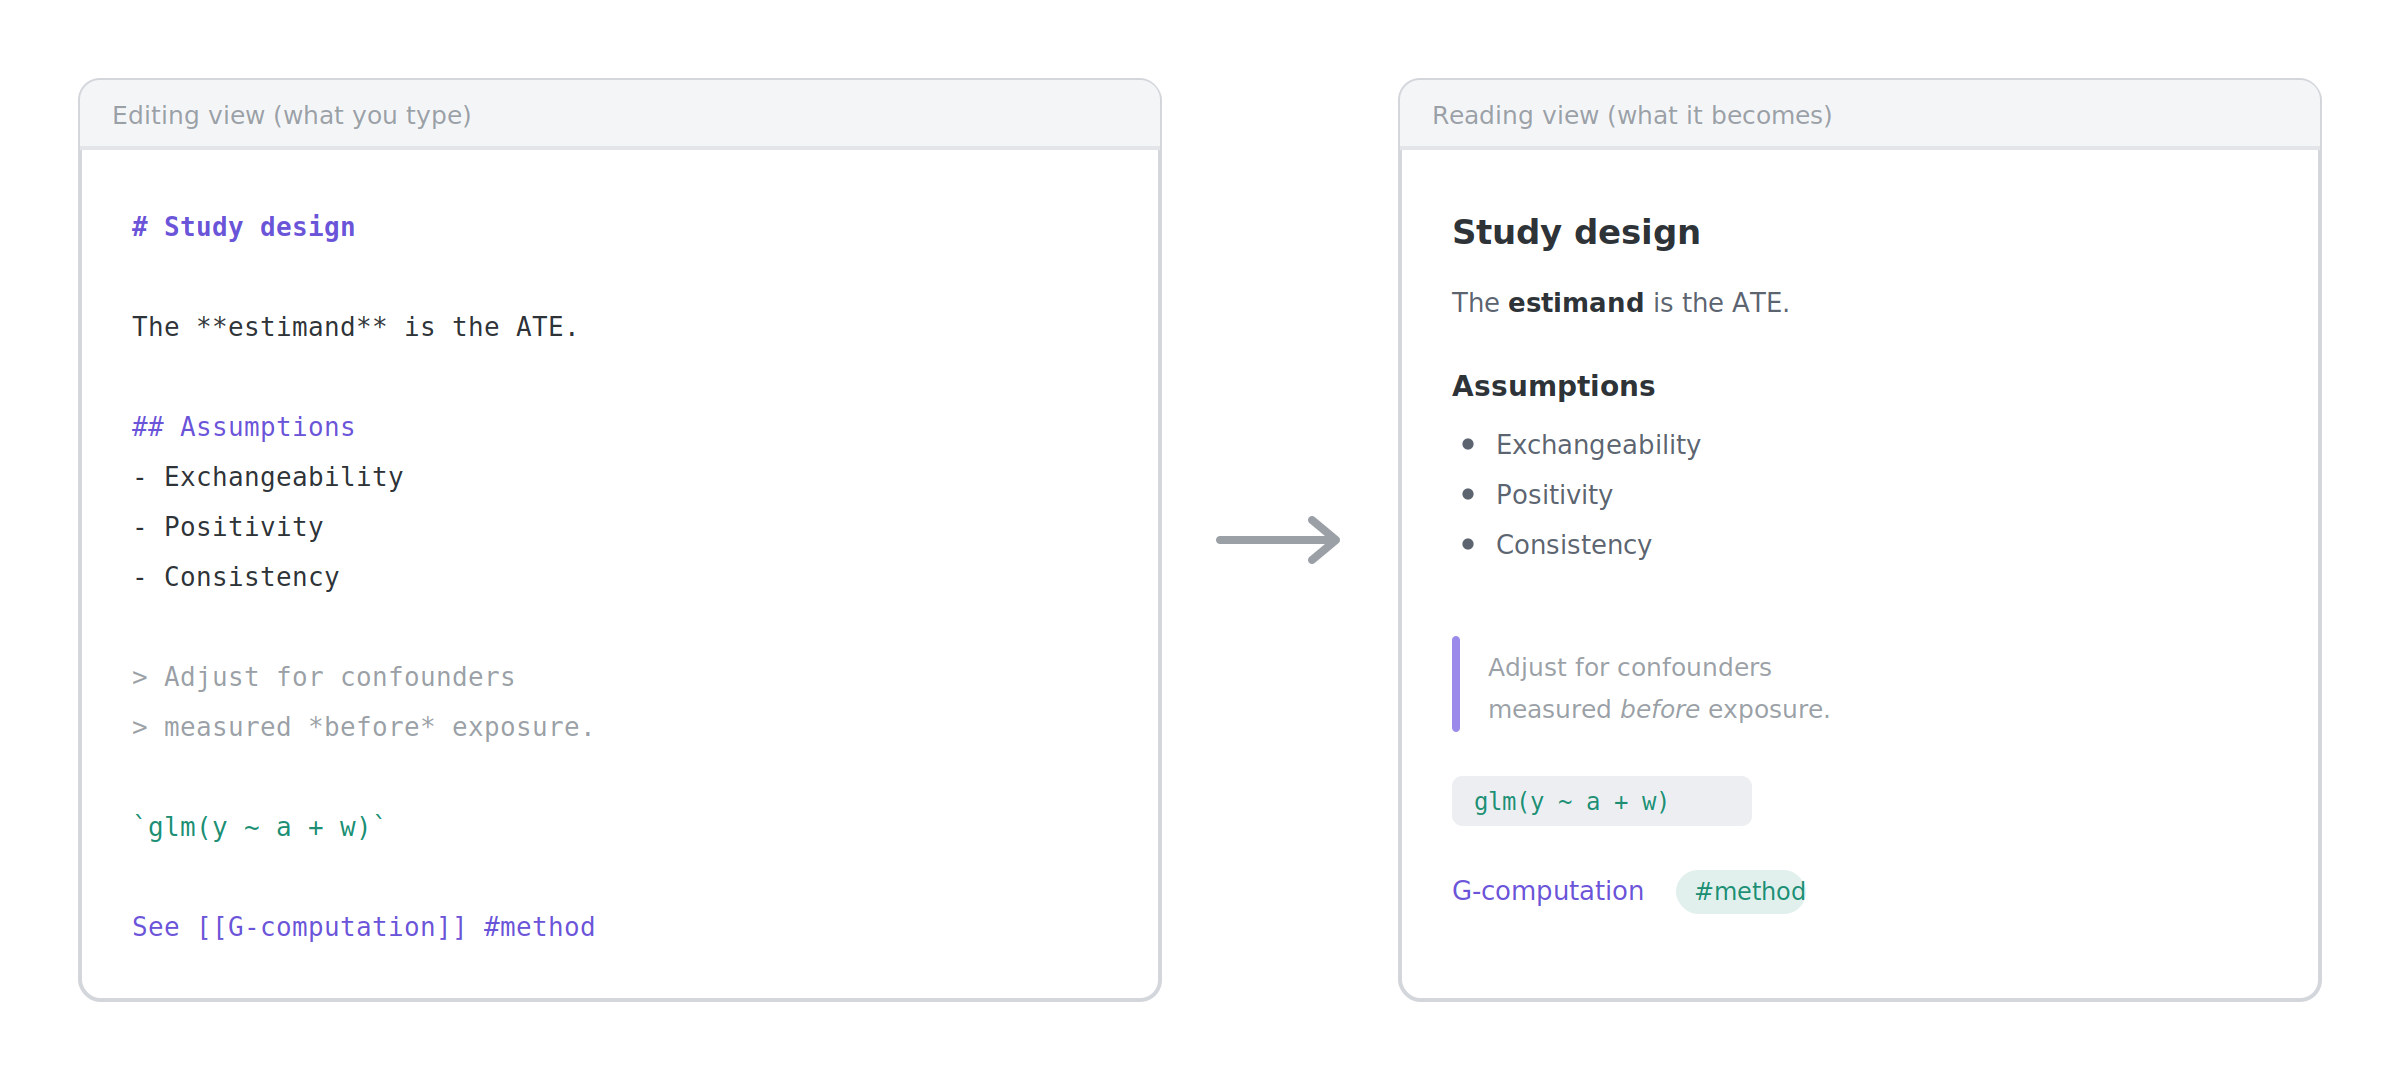
The syntax you will actually use day to day is small:
# Heading 1
## Heading 2

**bold**  *italic*  `inline code`

- bullet
- [ ] unchecked task
- [x] completed task

> blockquote

[[Link to another note]]
[[Link to another note|shown as this text]]
![[Embed another note entirely]]

#tag  #nested/tag
Two Obsidian-specific ones are worth calling out. The pipe in [[Note|display text]] lets the link read naturally in a sentence while still pointing at the right file. And ![[Note]] with a leading exclamation mark embeds the whole note inline rather than linking to it (useful for pulling a definition into a summary without duplicating it).
Step 4 — Write your first linked notes
This is the part that matters. Create a note called Confounding and write a couple of sentences. Somewhere in the text, type two opening square brackets: [[.
A dropdown appears. Start typing G-computation. Even though that note does not exist yet, press Enter — Obsidian creates it the moment you click through.
Now open G-computation and look at the Linked mentions panel.
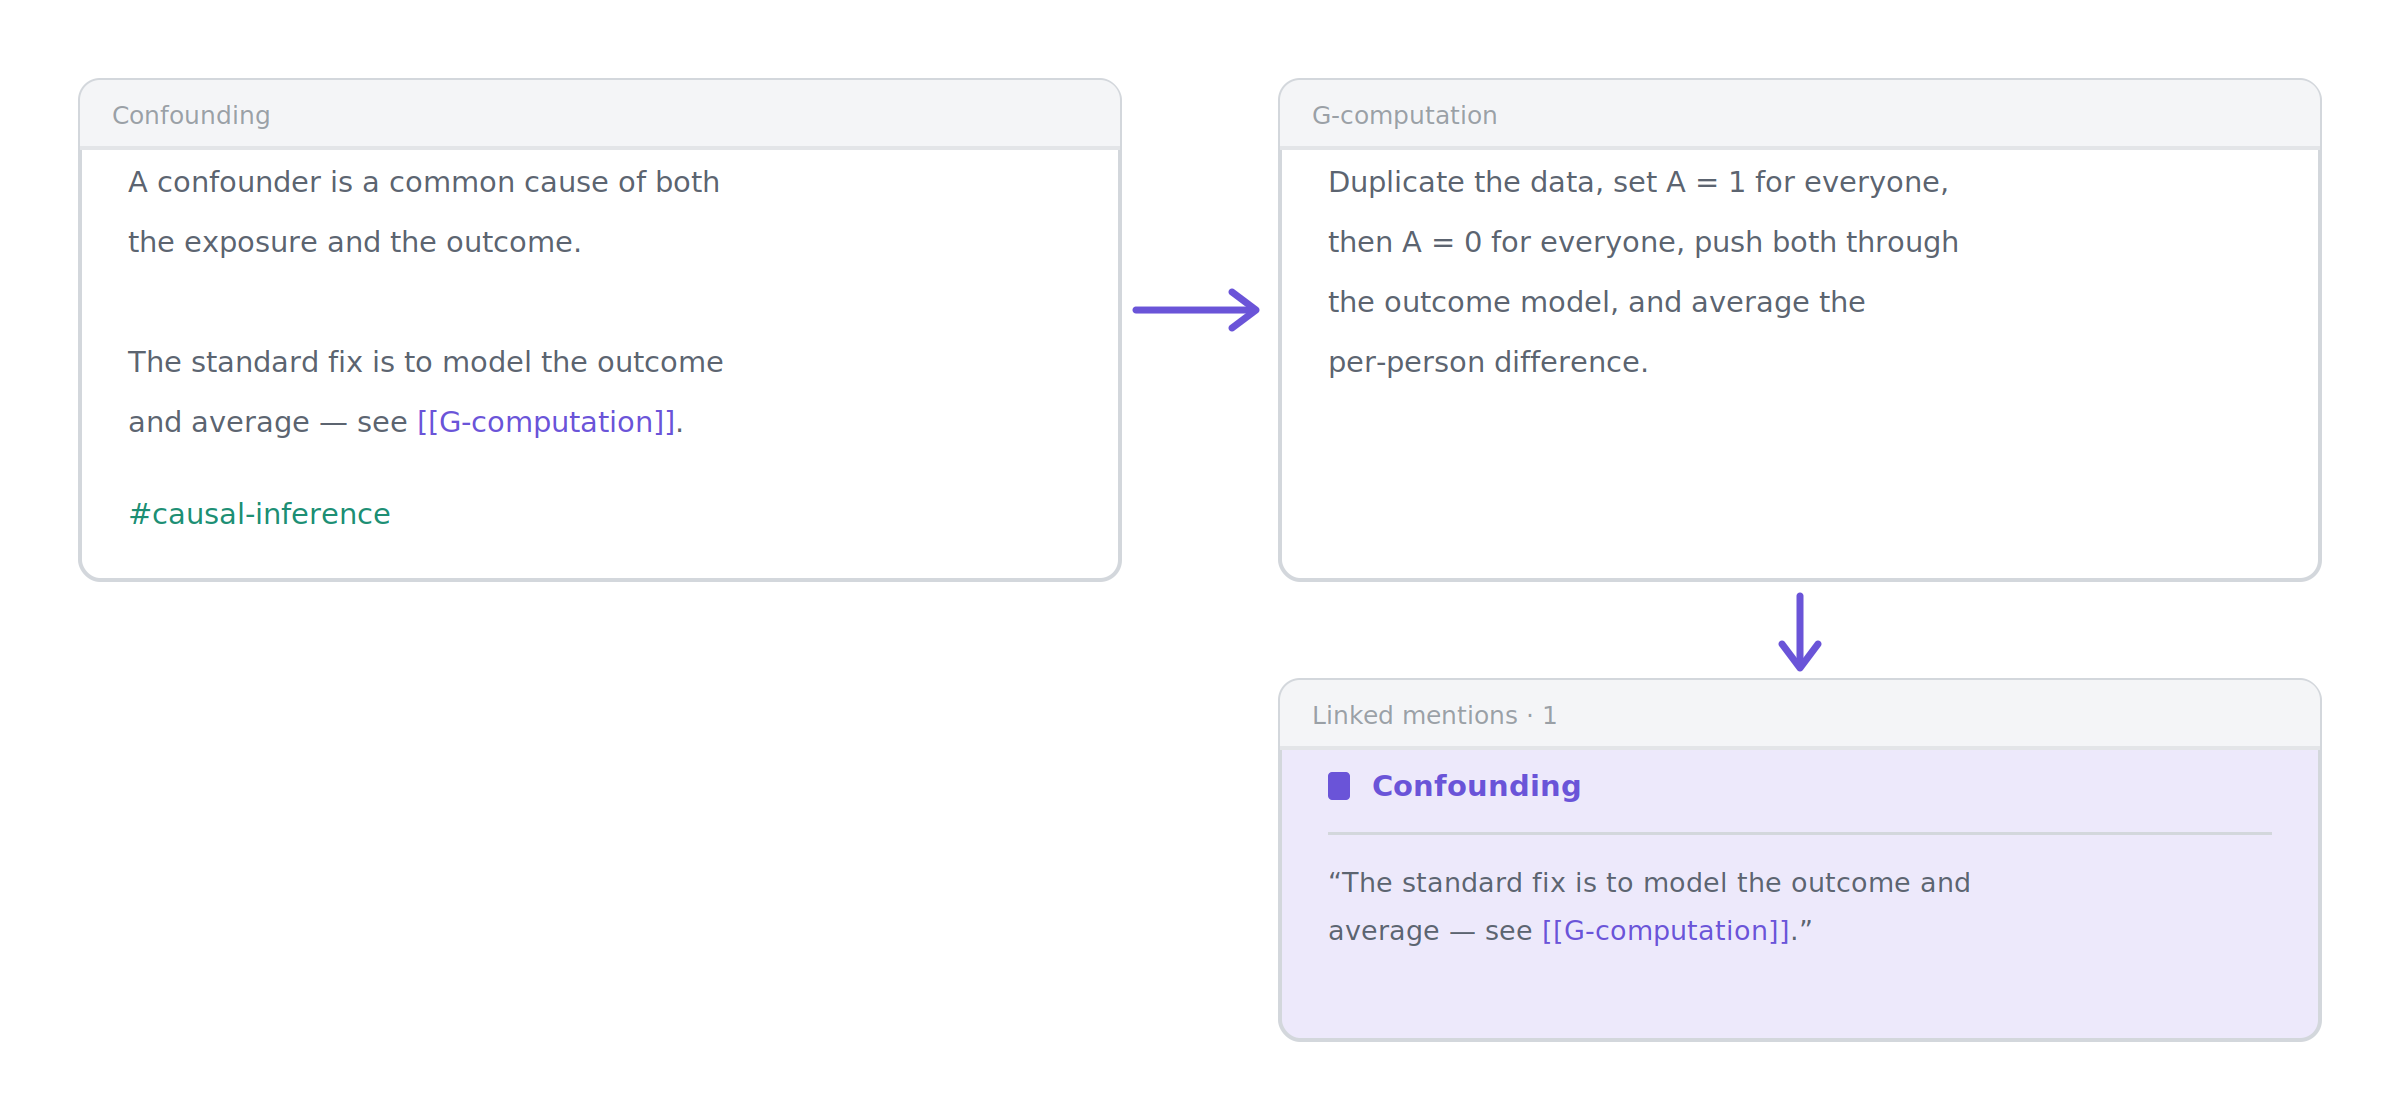
You typed one link. You got two. That is the whole trick, and it compounds: every time you link a new note to an old one, the old note gets richer without you touching it.
Step 5 — Organise with folders, tags, and links
New users spend their first week building an elaborate folder hierarchy and their second week discovering it does not fit. Obsidian gives you three organising tools, and they answer different questions.
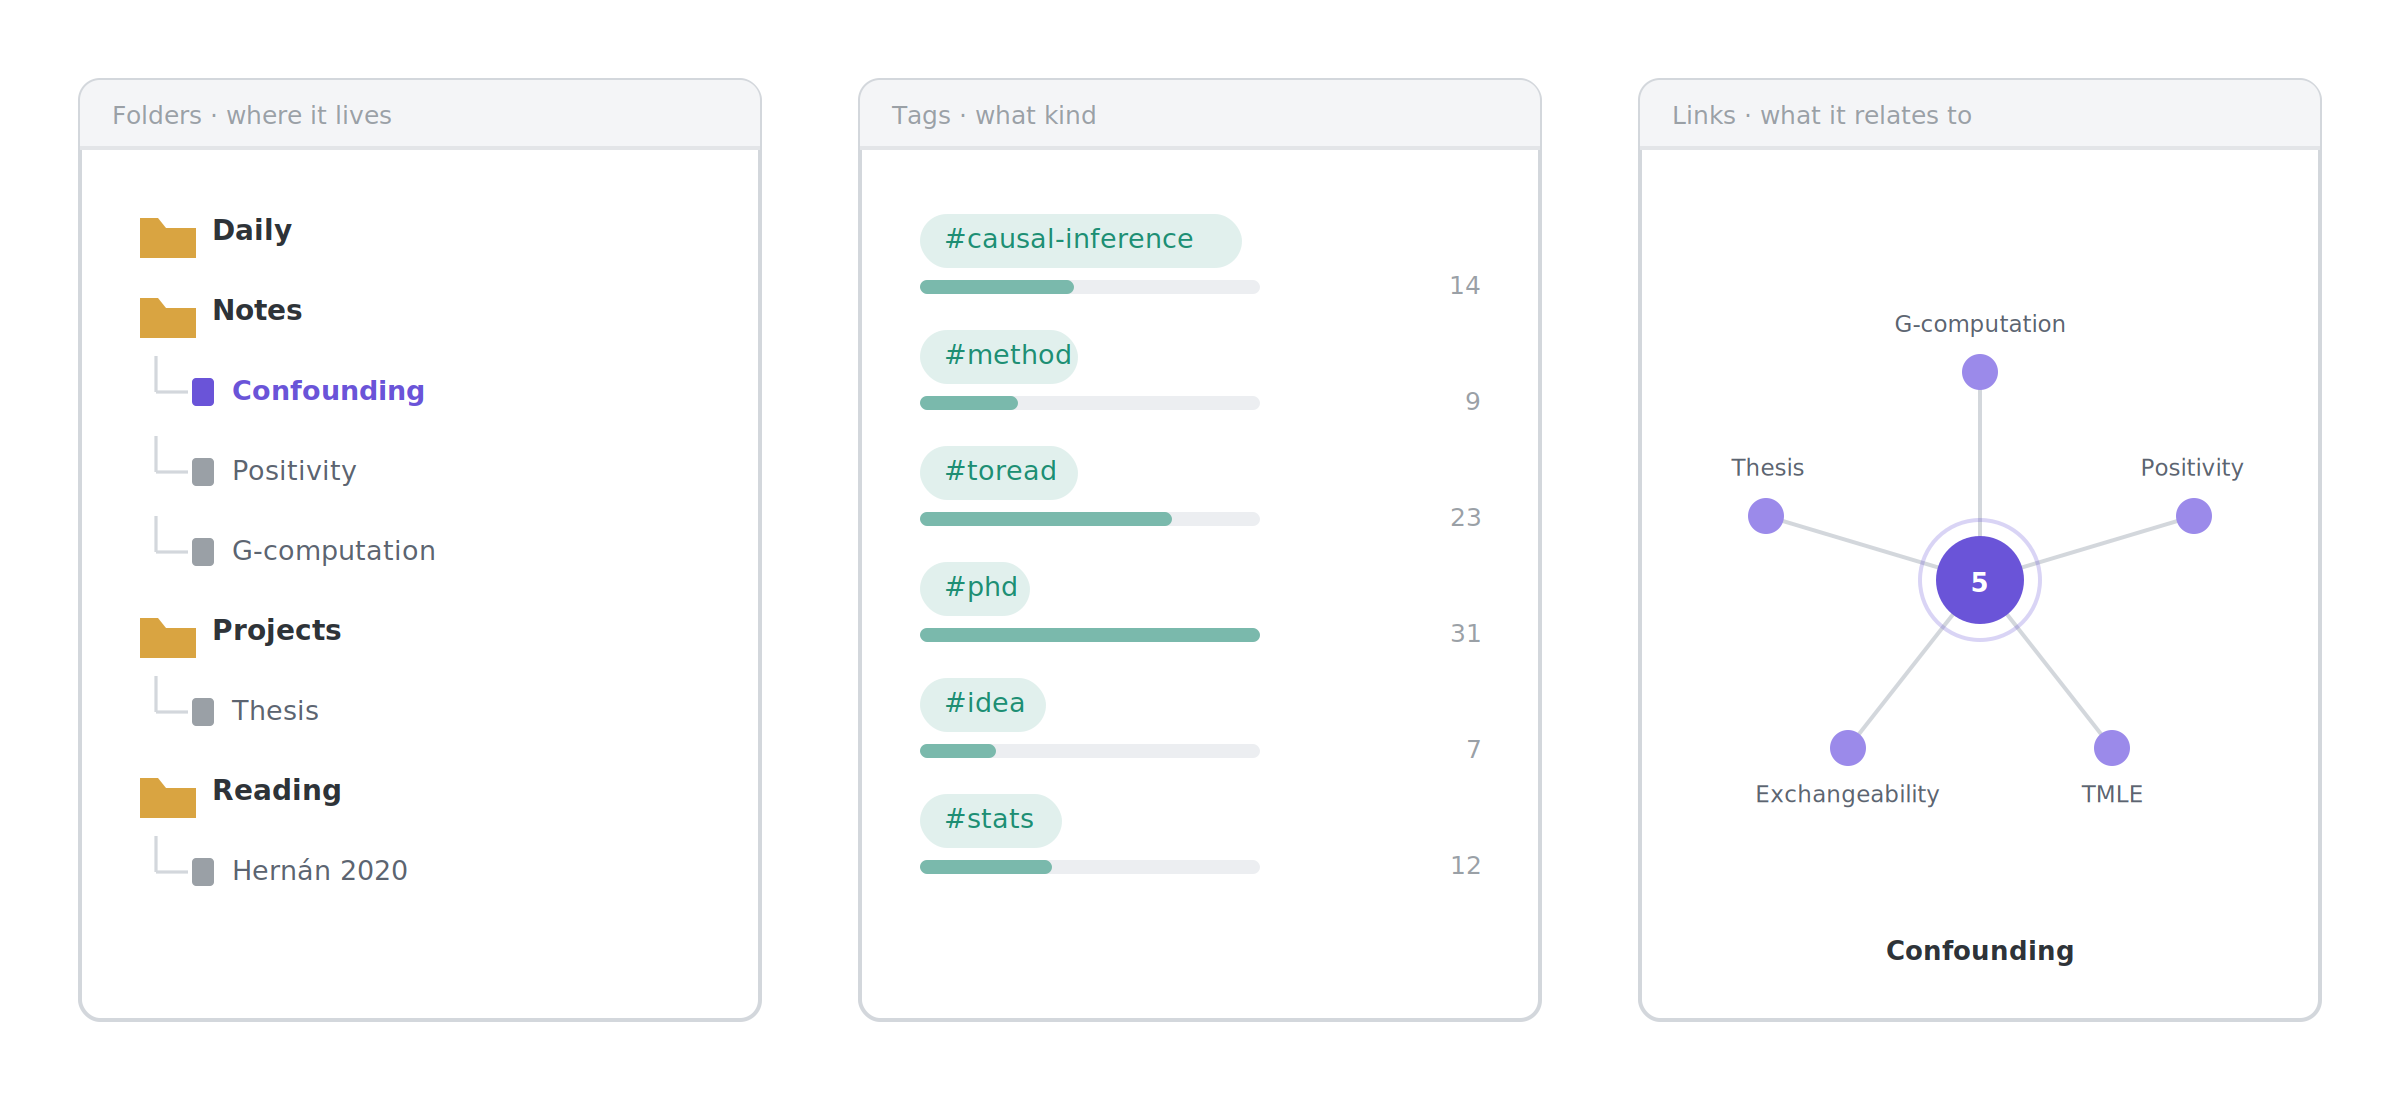
Folders answer where does this live? A note sits in exactly one. Use them for broad, stable categories. Three to six top-level folders is plenty. Tags answer what kind of note is this? Type #method or #toread anywhere in a note. A note can carry many, which makes tags good for status and type — things that cut across folders. Nested tags like #status/draft give you a little hierarchy without much cost. Links answer what is this related to? These do the real work. Folders and tags are coarse; links are specific.
The failure mode is over-investing in the first and under-using the third. A flat vault with good links is far more useful than a beautiful eleven-level folder tree with none.
Here is a starter structure:
my-vault/
├── Daily/            # one note per day, capture inbox
├── Notes/            # the permanent, linked notes
├── Projects/         # one note per active project
├── Reading/          # books, papers, articles
└── Templates/        # reusable note skeletons
Let Notes/ grow flat and link heavily inside it.
Step 6 — Set up daily notes as your inbox
Go to Settings → Core plugins and enable Daily notes. In its options, set the folder to Daily/ and the date format to YYYY-MM-DD so the files sort correctly.
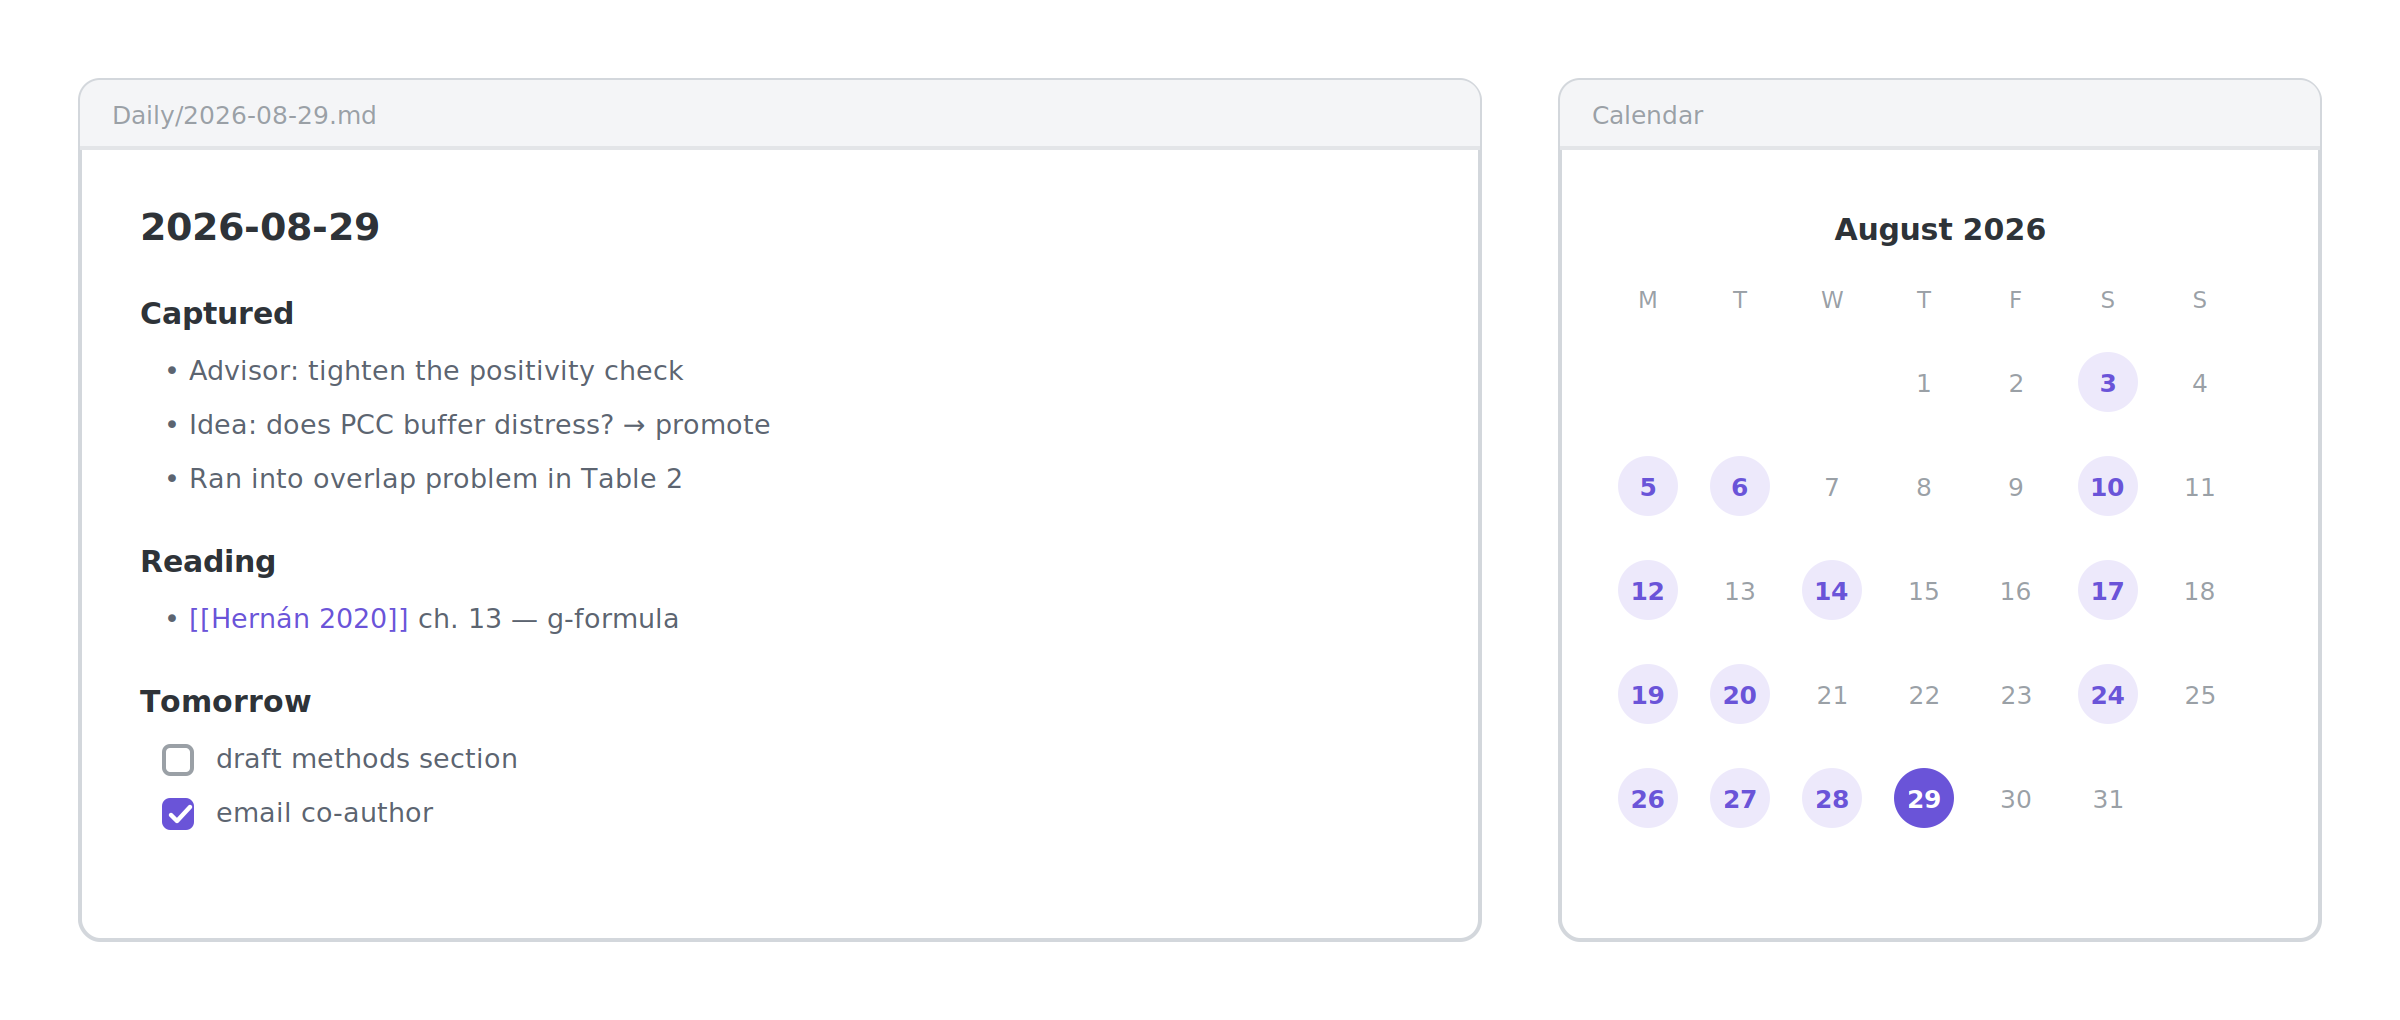
The daily note is a capture inbox, not an archive. Anything that occurs to you during the day lands here with no organising: meeting notes, half-ideas, a paper someone recommended, a problem you hit in your analysis. The bar for writing something down should be almost zero.
Later, you promote the few things that earned it into real notes in Notes/, with claim-style titles and links. Most of what you capture will not earn it, and that is the point. The inbox absorbs the noise so your permanent notes stay signal.
Turning on the Calendar community plugin gives you the month view shown above, which makes it easy to jump back to “that Tuesday when the model broke.”
Step 7 — Use templates to stop re-typing structure
Enable the Templates core plugin and point it at Templates/. Then create a file there like this:
# {{title}}

**Source:**
**Date:** {{date}}

## Summary

## Key points
-

## Links
-
Now Ctrl/Cmd + P → “Insert template” drops that skeleton into any new note.
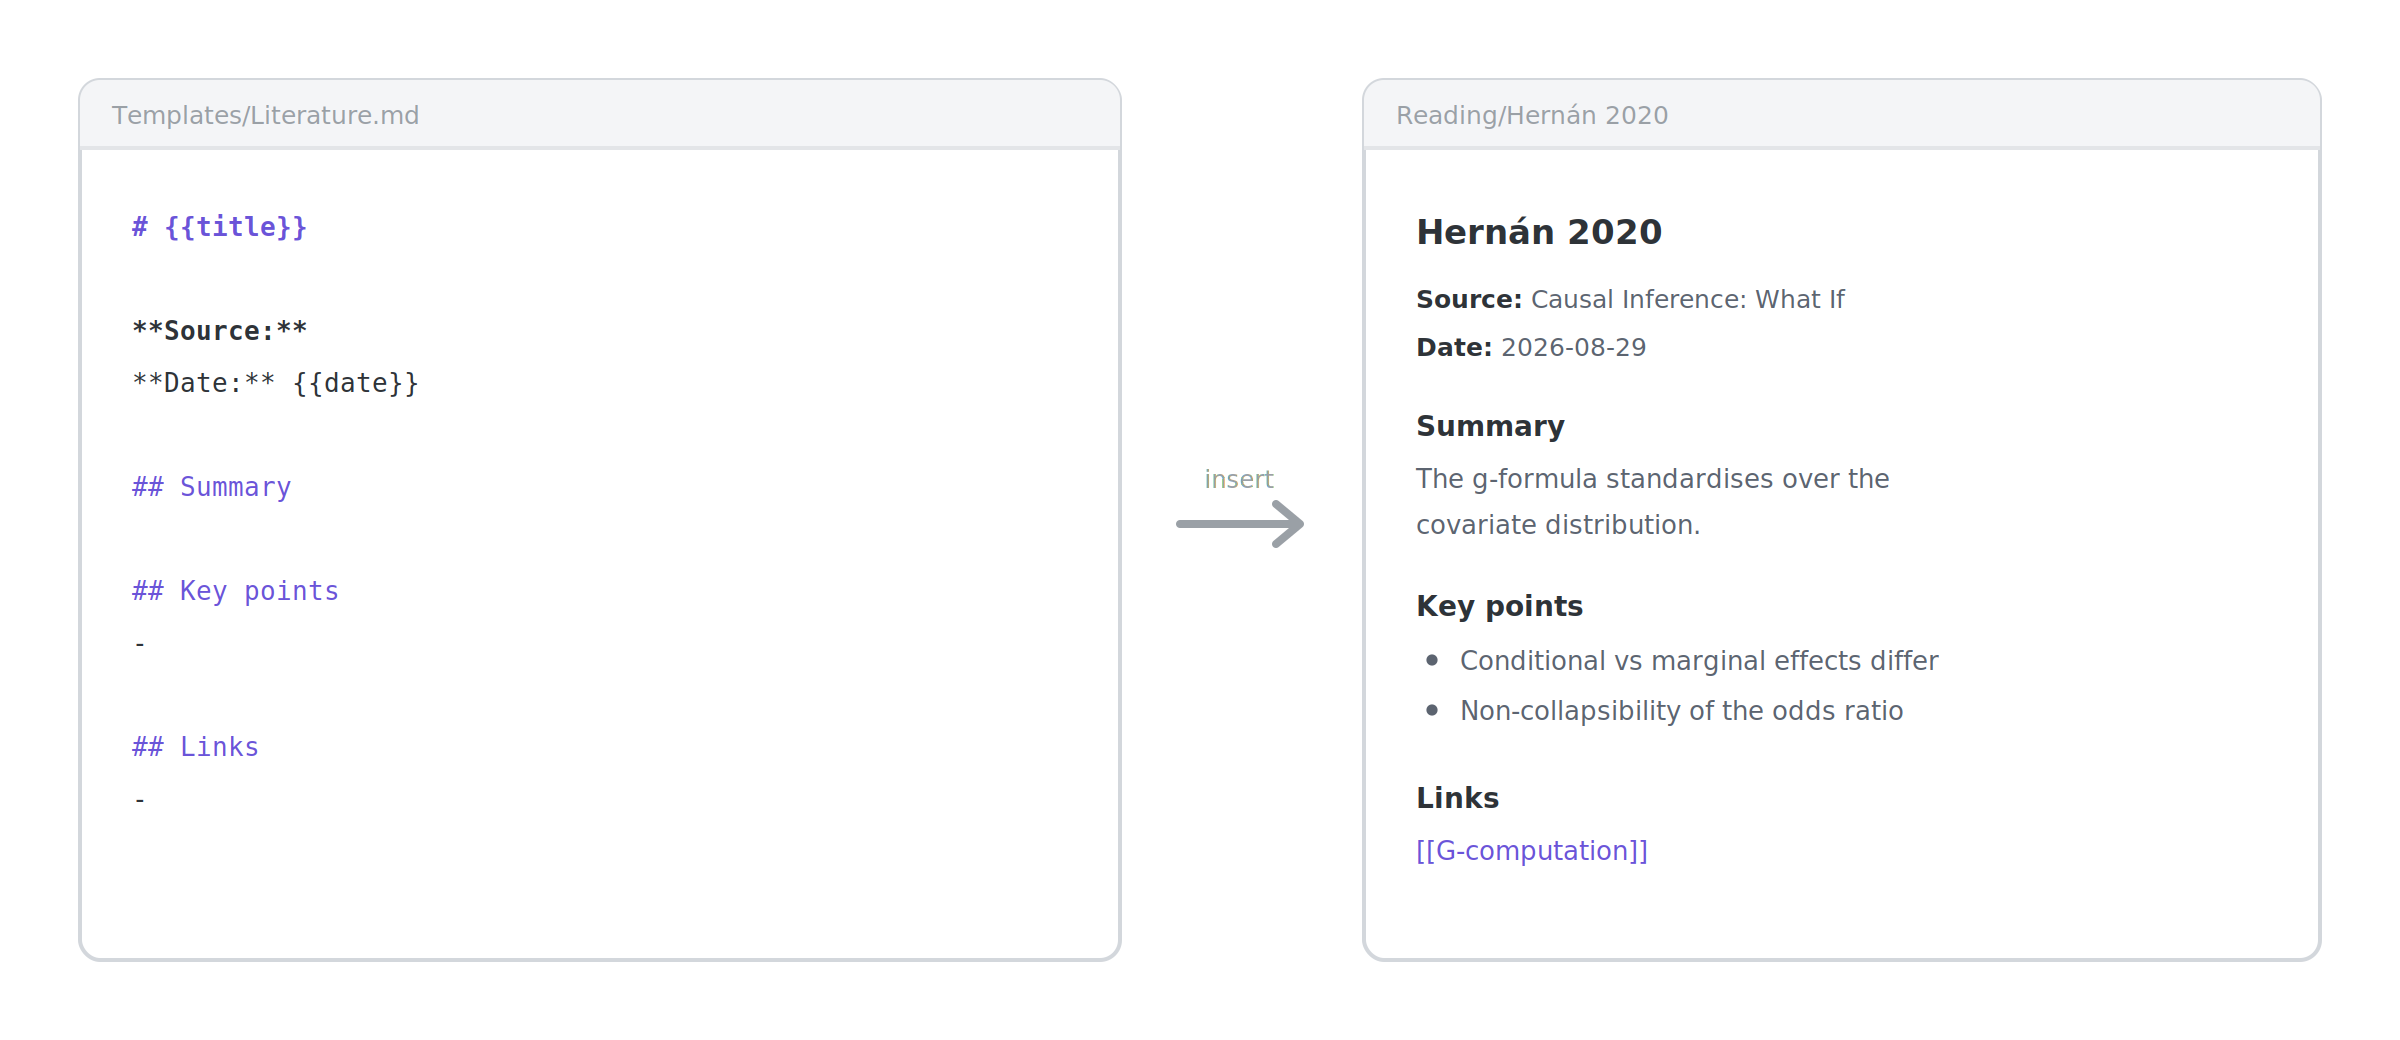
The payoff is not the typing you save. It is that every literature note has the same shape, so six months later you can skim thirty of them quickly, and a Dataview query can pull fields out of them reliably. Two or three templates is usually the right number: one for literature, one for meetings, one for projects.
Step 8 — Add a few community plugins
Community plugins live in Settings → Community plugins → Browse. You will need to turn off Restricted Mode first.
Resist installing twenty of them. Each is a thing that can break, conflict, or need migrating, and the most common way to end up with a broken vault and no notes in it is to spend week one configuring instead of writing. Add plugins to solve problems you have actually hit.
The ones that earn their place for most people:
| Plugin | What it solves |
|---|---|
| Dataview | Turns notes into a queryable database |
| Calendar | Month view for daily notes |
| Templater | Templates with logic — dates, prompts, scripting |
| Excalidraw | Hand-drawn diagrams stored inside the vault |
| Style Settings | Tweak theme colours and spacing without CSS |
Dataview is the one that changes how the vault feels. Instead of maintaining an index note by hand, you write a query and it stays current.
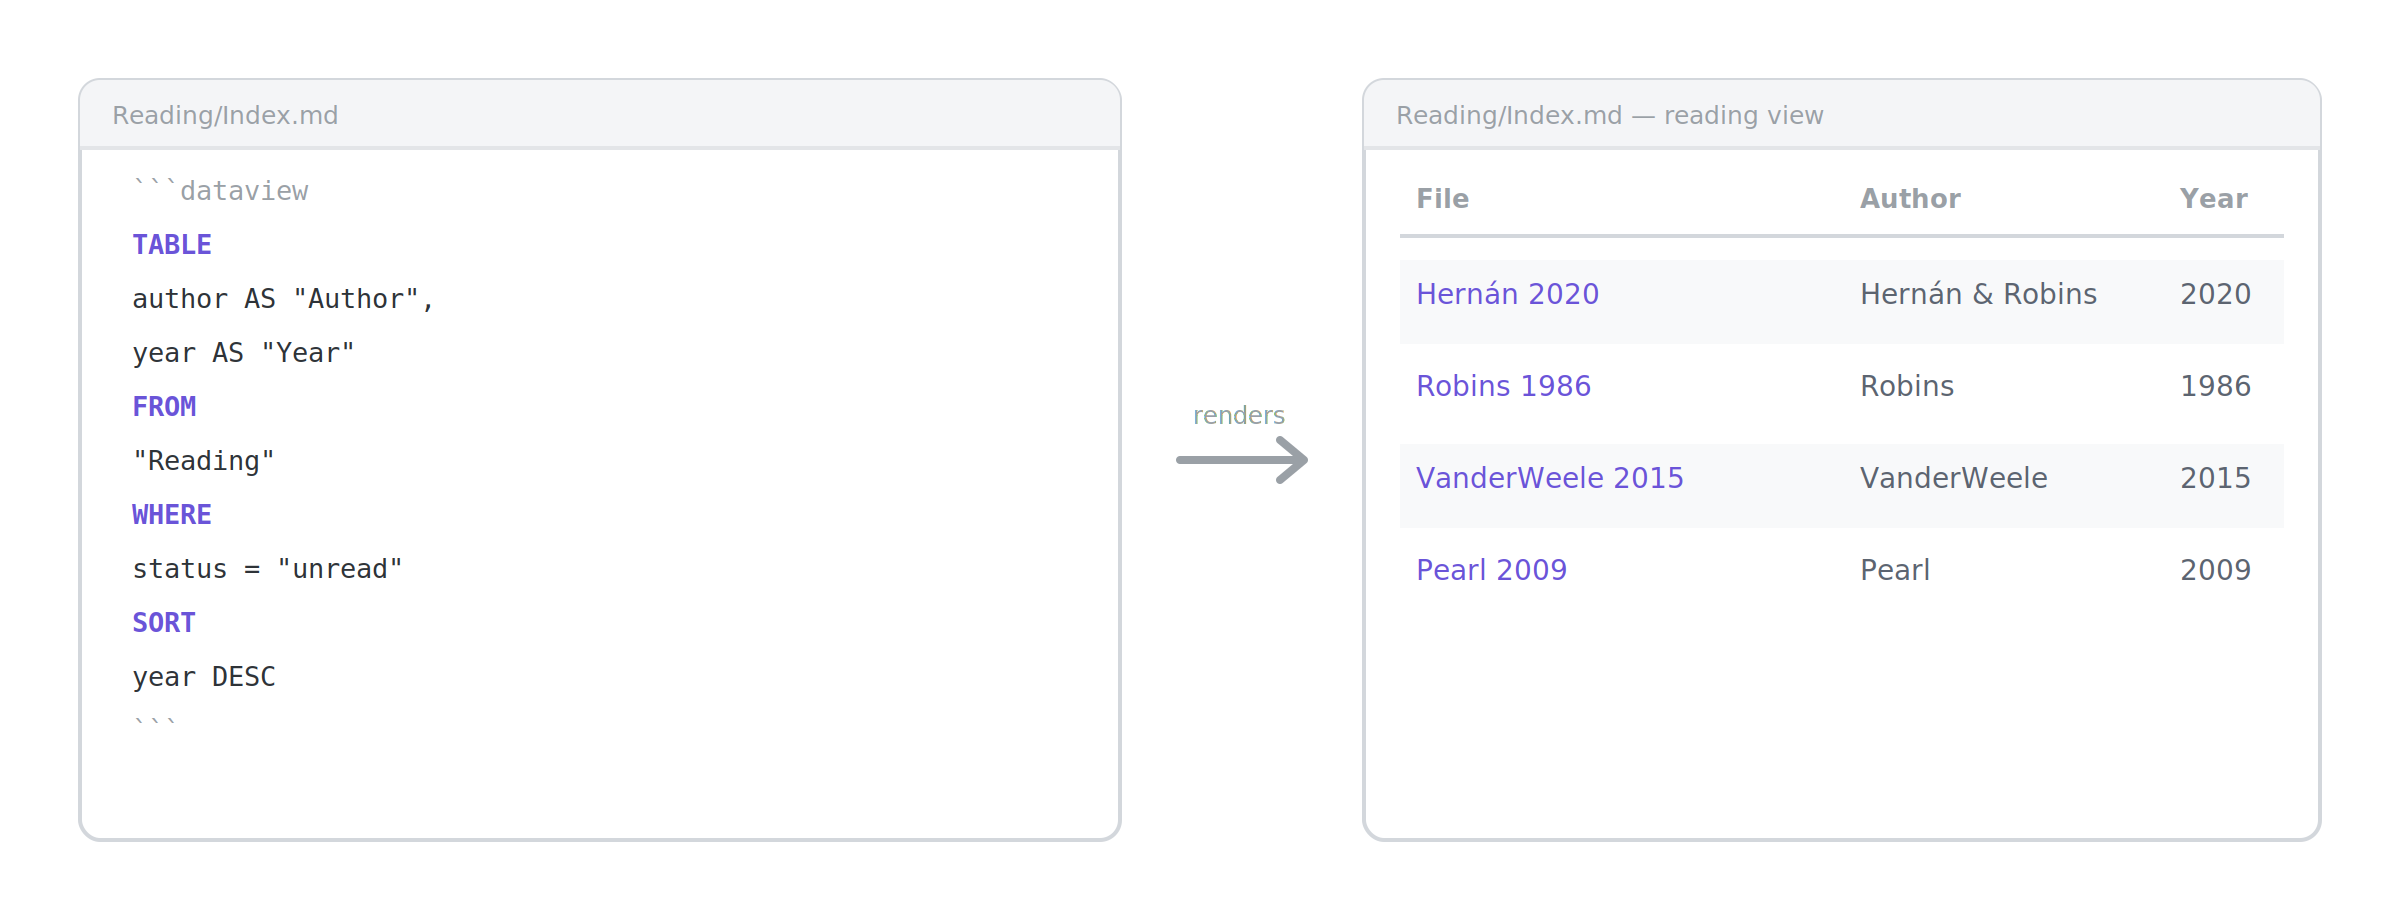
That query sits in a normal note. Every time you open it, Obsidian scans the Reading/ folder and rebuilds the table, so a paper you add next month appears without you editing anything.
Step 9 — Build the habit, then check the graph
Here is the honest truth about the graph view: it is beautiful, it is motivating, and it is useless for the first month.
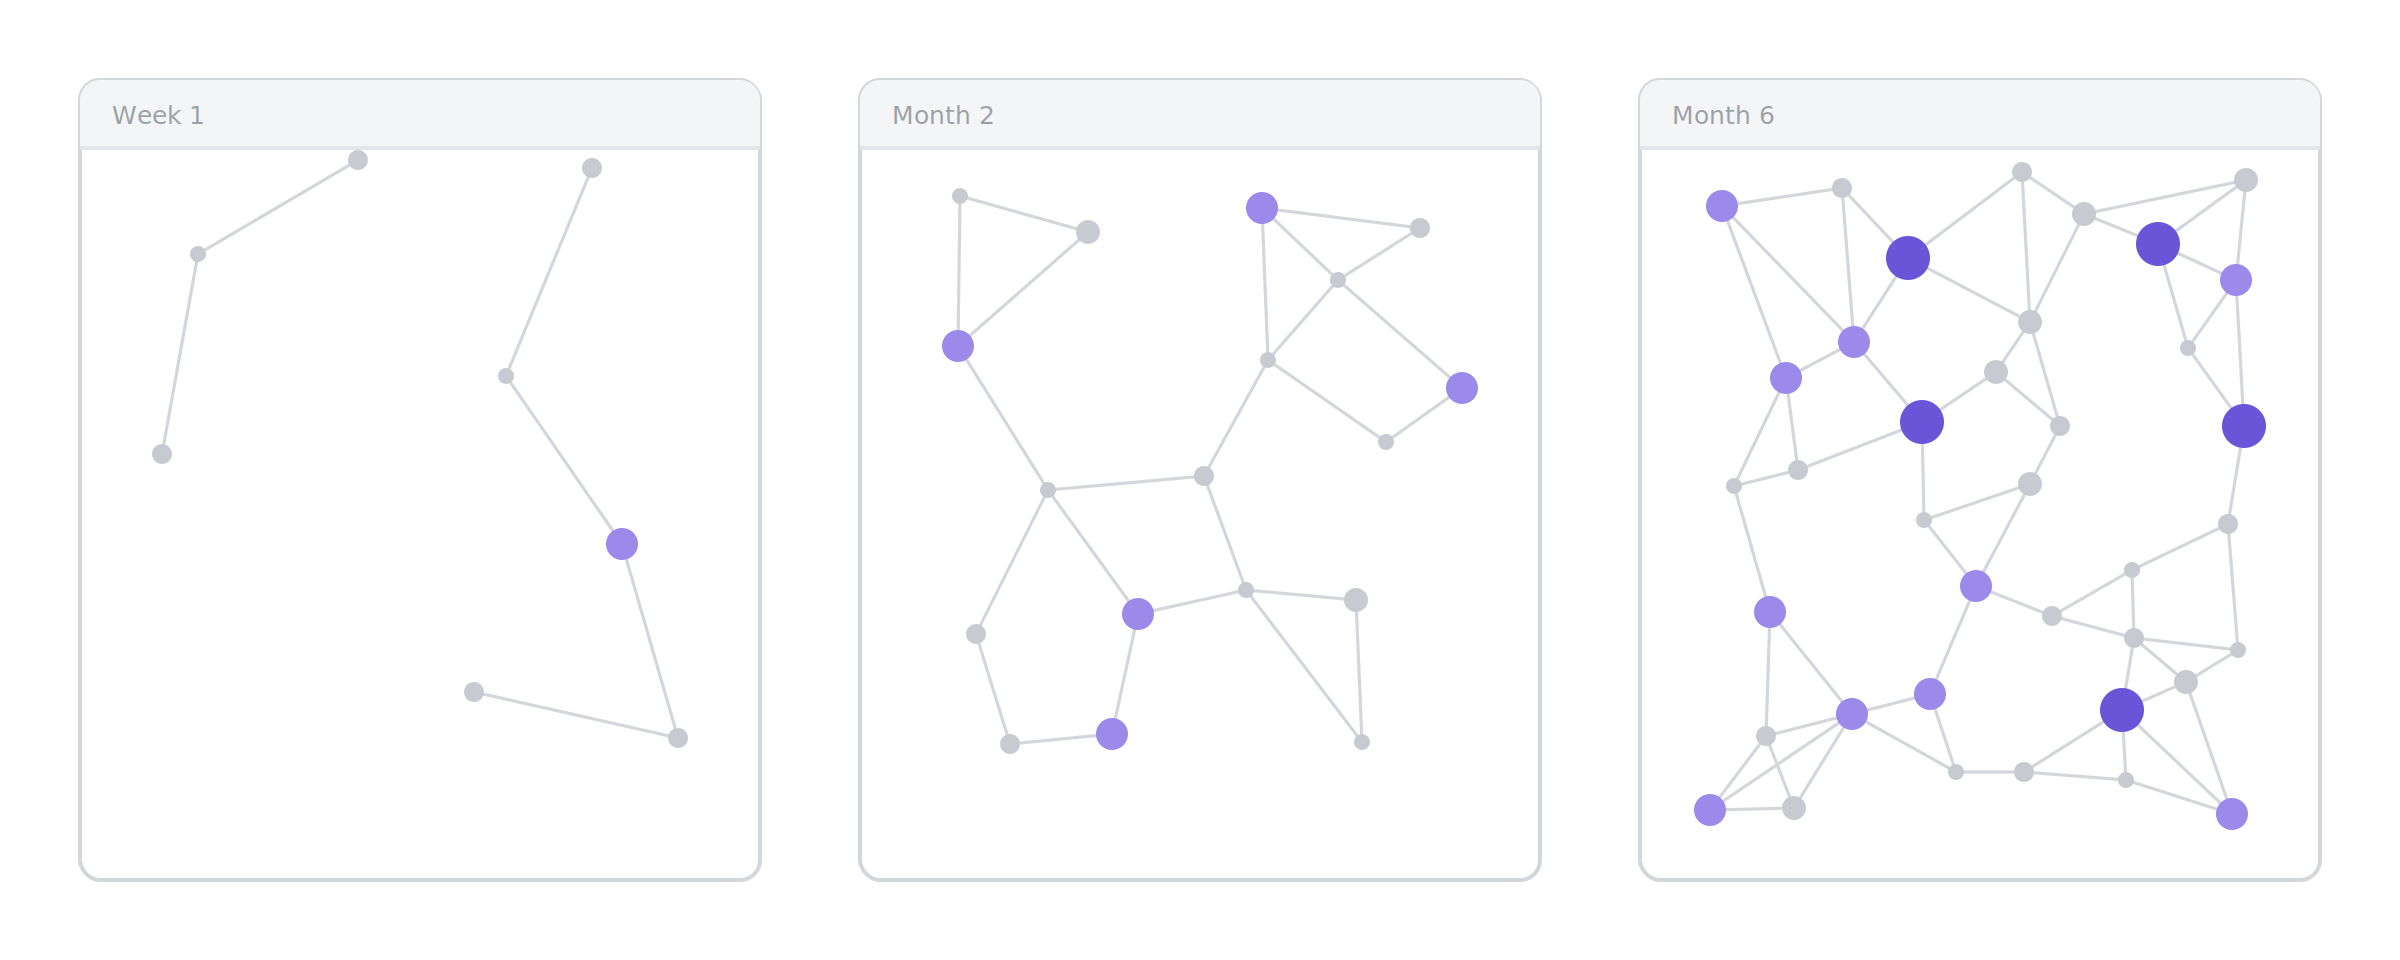
A graph of twelve notes tells you nothing you did not already know. A graph of four hundred shows you clusters you never planned, orphan notes you should link or delete, and hub notes that turn out to be the real organising centres of your thinking.
Common beginner mistakes
Building structure before content. You cannot design the right hierarchy for notes you have not written. Start flat and let structure emerge.
Installing too many plugins. Add them to solve problems you have actually hit, not problems a video told you about.
Treating it as an archive. A vault full of clipped articles you never linked or reread is a graveyard, not a knowledge base. One note you wrote in your own words beats ten you pasted.
Splitting into many vaults. Links do not cross vault boundaries. One vault, folders inside it.
Chasing the perfect system. Every month someone publishes a new methodology with an acronym. The people getting real value from Obsidian are mostly running something boring and consistent. Boring and consistent wins.
Over-tagging. If every note carries eight tags, tags stop narrowing anything. A handful you actually filter on beats a taxonomy you admire.
A two-week starting plan
If you want something concrete to follow:
Days 1–2. Install, create one vault, make the five folders. Write three notes about things you already know well and link them to each other.Days 3–7.Turn on daily notes. Capture into them every day, without organising. Do not touch settings.Day 7.First review. Promote two or three captures into real notes. Notice what you keep reaching for.Week 2.Add a literature template. Install Dataview only if you feel the need for an index. Write a note that links to five existing ones.End of week 2.Open the graph for the first time. It will be small, and that is fine.
Once the daily loop is automatic, the next steps are richer Dataview queries, Templater for dynamic templates, and if you want to publish, either Obsidian Publish or a static-site generator like Quartz, which renders a vault into a website for free.
But none of that matters until the habit exists. After installation, everything else is elaboration. I hope this helps!